")


Affiliate Disclosure: This post contains affiliate links. We may earn a small commission when you purchase through our links, at no extra cost to you. Thank you for supporting The Rollin’ Pin Bakery.
Our Whisk + Grace pumpkin pie has become the heart of our holiday baking. There are recipes we bake because the season calls for them, and then there are recipes we bake because they carry a piece of who we are. Pumpkin pie has always been one of those for me.
I grew up watching the women in my family move around the kitchen in this quiet, steady rhythm. Long before I understood measurements or bake times, I understood the way holidays felt in the kitchen. The laughter. The stories. The children running in and out. The smell of spices warming before the oven even clicked on. The love tucked into something as simple as a pie cooling on the counter.
And somewhere along the way, pumpkin pie became more than dessert.
It became a marker of time.
A reminder that no matter how fast life spins, there are still moments meant to be savored.
Moments meant to be handed down.
Now, every year when I pull out my glass mixing bowls and set my ingredients on the counter, I feel that same familiar pull. My kids wander in. Someone steals a taste of brown sugar. Someone else asks if they can help roll the dough. And just like that, a recipe turns into a memory. That is why I love baking. That is why this pie means so much to me.
So today, instead of just giving you a recipe, I want to invite you into the moment.
Into my kitchen.
Into the pause.
Into the tradition.
Let’s make this pie together the way a mother teaches her kids, the way a friend teaches a friend, the way memories are built one warm step at a time.
⸻
Let’s Start With the Crust
Go ahead and dust your counter with flour. Pull out your chilled dough and your rolling pin, and take your time. There’s no rush here. Roll it gently, turning every few strokes until it becomes a soft, even circle. If your kids want to help, let them. Some of the best pies carry little fingerprints in the dough.
Lay the dough into your 9-inch pie dish, tucking the edges like you’re folding a little blanket. Press lightly. Let it take shape in your hands. Then crimp the edges however you like—simple, wavy, rustic, pretty. There is no wrong way to make something from the heart.
Brush the edges with egg wash using your pastry brush, and set it aside for a moment while we get ready to par-bake.
⸻
Par-Baking: The Foundation of a Good Pie
Line the crust with parchment and pour in your pie weights. This step keeps everything where it belongs while the heat works its magic.
Slide the dish onto a baking sheet and into the oven.
This is the moment the house starts changing.
The air warms.
The spices you haven’t even added yet start whispering through the kitchen.
You can feel the holidays settling in.
While the crust bakes, go ahead and gather your ingredients. Set them out neatly on the counter like the women before us always did. A little order in the middle of a busy season is a gift in itself.
⸻
Let’s Make the Filling Together
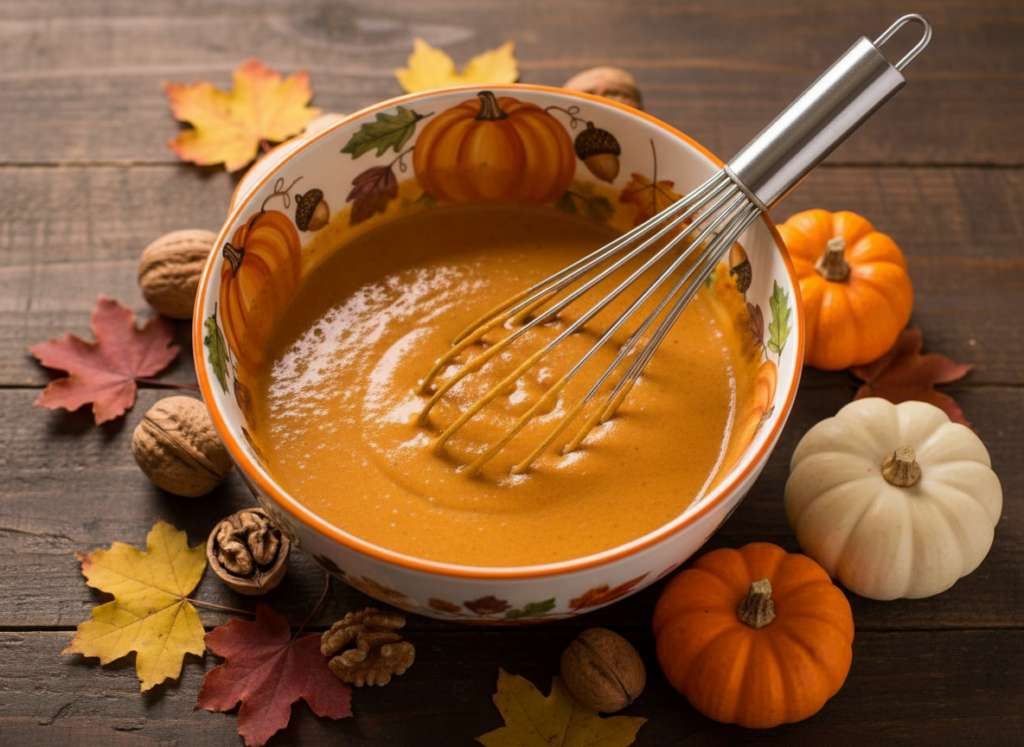
In your favorite glass mixing bowl, whisk the pumpkin and eggs until they become one smooth, silky base. Add the brown sugar. Stir until it deepens in color. Then sprinkle in the cinnamon, ginger, nutmeg, cloves, and that quiet pinch of pepper.
This is where the scent becomes unmistakable.
This is where kids wander in asking, “Can I help?”
This is where your heart softens a bit, remembering holidays gone by.
Add the cornstarch and salt, whisk again, then pour in the heavy cream and milk until the mixture turns glossy and velvety. It should feel like comfort in a bowl.
There’s something grounding about this step, the rhythm of the whisk, the sound of the bowl against the counter, the pause between ingredients.
⸻
Pour, Bake, Breathe
Take the warm crust from the oven and pour the filling in slowly. Let it settle into every corner.
Place the pie back in the oven. About halfway through, gently place your pie crust shield around the edges—protecting the beautiful crimp you worked so hard on.
When the center has a soft wobble, not a slosh, it’s ready.
Place the pie carefully on your cooling rack.
Now comes the hardest part—waiting.
Pumpkin pie teaches patience.
It needs time to become its best self.
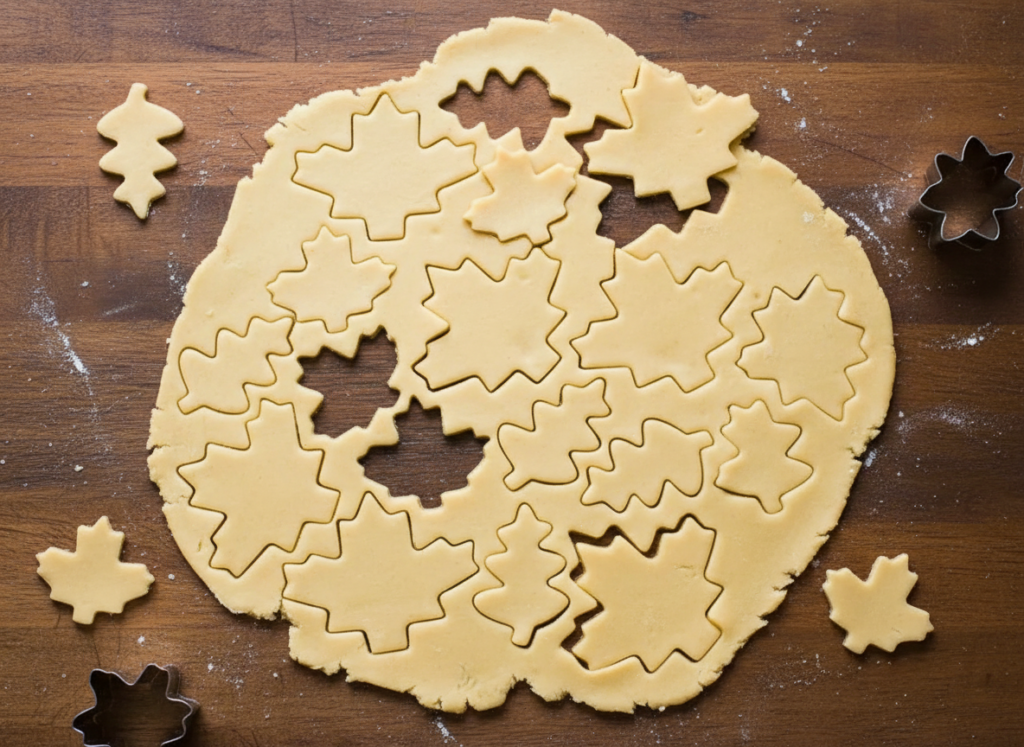
And while it cools, you can roll out extra dough and use your fall cookie cutters to make little leaves for decorating. It’s simple, sweet, and something the kids absolutely adore helping with.
Special Tools (affiliate links): Glass Mixing Bowls | Saucepan | Baking Sheet | Silicone Baking Mat or Parchment Paper | Rolling Pin | 9-inch Pie Dish | Pastry Brush | Pie Weights | Whisk | Pie Crust Shield | Cooling Rack | Fall Cookie Cutters.
PrintWhisk + Grace Holiday Pumpkin Pie Recipe
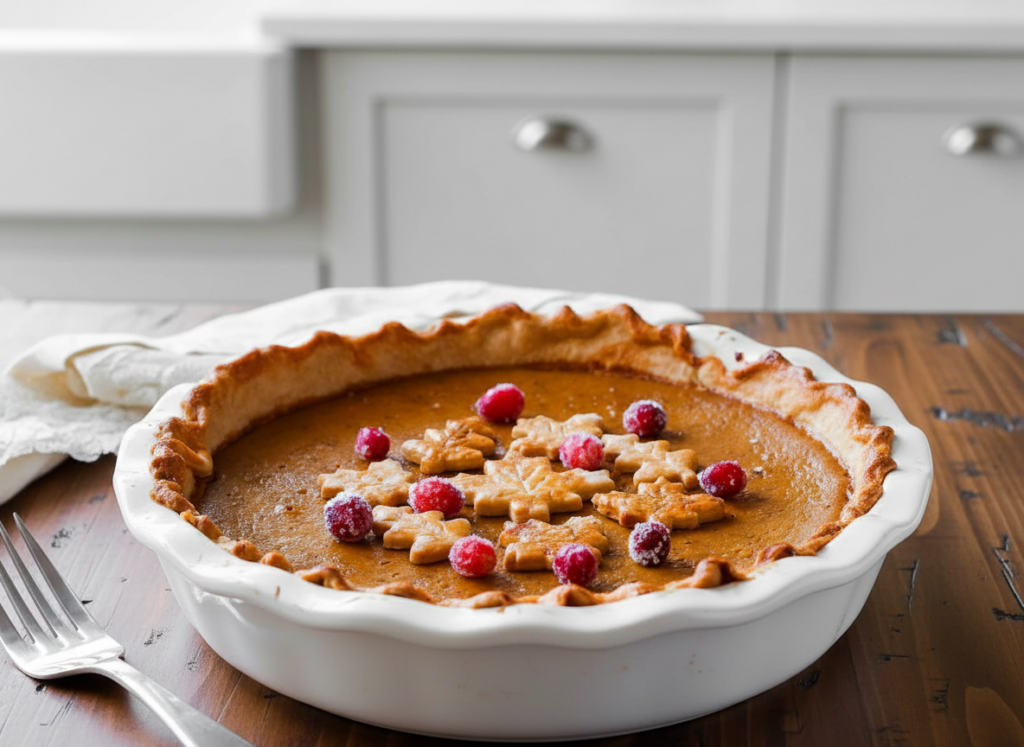
Rich, velvety, and full of warm holiday spice, this pumpkin pie is a Whisk + Grace classic. The filling bakes smooth and silky every time, nestled inside a perfectly golden homemade crust. It’s beautiful served as is or topped with fresh whipped cream. The pie crust leaves and sugared cranberries are simply for decoration, so feel free to skip them if you want something a little simpler. Whether you dress it up or keep it traditional, this pumpkin pie brings comfort, nostalgia, and the perfect holiday flavor to every table.
- Prep Time: 45 minutes
- Cook Time: 1 hour, 5 minutes (includes blind bake)
- Total Time: 5 hours (includes cooling)
- Yield: serves 8–10; 1 cup sugared cranberries 1x
- Category: Pies
Ingredients
Sugared Cranberries (optional)
1 cup fresh cranberries
3/4 cup water
1 1/4 cups granulated sugar, divided
Pie Crust
1 homemade pie crust or store-bought pie dough
Extra dough for decorative leaves
Egg wash: 1 egg + 1 tbsp milk
Pumpkin Filling
1 can (15 oz) pumpkin puree
3 large eggs
1 1/4 cups brown sugar
1 tbsp cornstarch
1/2 tsp salt
1 1/2 tsp cinnamon
1/2 tsp ginger
1/4 tsp nutmeg
1/8 tsp cloves
1/8 tsp black pepper
1 cup heavy cream
1/4 cup milk
Instructions
- Prepare cranberries in a glass mixing bowl, simmer syrup in a saucepan, dry on a baking sheet lined with Make Sugared Cranberries (Optional)
If you plan to top your pie with sugared cranberries, prepare them first. They need time to rest and dry, so starting them the night before works best.
Place the cranberries in a glass mixing bowl and set aside. In a saucepan over medium heat, warm the water and 3/4 cup sugar, stirring until the sugar fully dissolves. Remove from heat and let the syrup cool for about 5 minutes.
Pour the warm syrup over the cranberries and stir gently to coat. Cover the bowl and let the cranberries sit for 15 minutes.
Line a baking sheet with a silicone baking mat or parchment paper.
Using a slotted spoon, transfer the cranberries onto the prepared sheet in a single layer. Allow them to dry uncovered for one hour.
Add the remaining 1/2 cup sugar to a clean bowl. Toss the cranberries in the sugar until they’re evenly coated, then return them to the lined baking sheet. Let them dry again, uncovered, for at least another hour at room temperature or in the refrigerator.
Store them covered in the refrigerator for up to 3 days.
2. Prepare the Pie Crust
If using homemade dough, roll out one disc of chilled dough on a lightly floured work surface using your rolling pin. Roll into a 12-inch circle, lifting and turning the dough every few rolls so it stays even.
Carefully place the dough into your 9-inch pie dish, letting it settle naturally into the corners. Fold any overhanging dough underneath to create a thick, sturdy edge. Crimp or flute the edges however you prefer.
Brush the edges lightly with egg wash using your pastry brush.
3. Par-Bake the Crust
Line the crust with parchment paper, shaping it so it sits flush against the dough. Fill the crust with pie weights, making sure they’re evenly distributed.
Bake at 375°F (190°C) for 10 minutes.
Remove the crust from the oven, lift out the parchment and weights, and prick the bottom of the crust several times with a fork to create steam vents.
Return the crust to the oven and bake for an additional 7–8 minutes, or until the bottom just begins to turn lightly golden.
Set aside while you prepare the filling.
- Make the Pumpkin Filling
In a glass mixing bowl, whisk together the pumpkin puree, eggs, and brown sugar until smooth and well combined. Add the cornstarch, salt, cinnamon, ginger, nutmeg, cloves, and black pepper. Mix until the spices are fully incorporated.
Slowly pour in the heavy cream and milk, whisking continuously until the mixture becomes silky and uniform with no streaks of spice.
- Bake the Pie
Pour the pumpkin filling into the warm crust, filling it about three-quarters full. If you have extra filling, save it for mini pies or a small ramekin custard.
Bake at 375°F for 55–60 minutes.
Check the pie at the 25-minute mark and cover the edges with a pie crust shield to prevent over-browning.
The pie is ready when the outer edges are set and the center has a soft, gentle wobble. Every oven bakes differently, so begin checking around the 50-minute mark and continue in 5-minute increments as needed.
- Cool Completely
Place the baked pie on a cooling rack and allow it to cool completely, at least 3 hours. This cooling time is essential for the custard to finish setting.
- Garnish & Serve
Once cooled, decorate the pie with sugared cranberries, pie crust leaves made with fall cookie cutters, or leave it beautifully simple.
Serve with fresh whipped cream if you like.
Cover leftovers tightly and store in the refrigerator for up to 5 days.
Notes
Make Ahead & Freezing: Pumpkin pie is a wonderful make-ahead dessert because the flavors deepen as it rests. You can bake this pie 1 day in advance and store it covered in the refrigerator until serving.
The baked pie also freezes beautifully. Wrap tightly and freeze for up to 3 months. Thaw overnight in the refrigerator before slicing.
Pie crust dough freezes well for up to 3 months too. Thaw in the refrigerator before rolling.
If you plan to garnish with sugared cranberries or pie crust leaves, begin those the night before so everything is ready when your pie cools.
The filling can also be mixed a day ahead. Cover tightly and refrigerate overnight. The extra resting time allows the spices, pumpkin, and brown sugar to blend fully, giving your pie deeper, richer flavor.
Cranberries: Use fresh cranberries when making sugared cranberries. Frozen berries don’t coat evenly in the syrup and tend to shrivel as they dry.
Pumpkin: Canned pumpkin puree works best for consistent texture.
If you prefer using fresh pumpkin puree, blot it lightly with paper towels to remove excess moisture. Fresh puree can make the filling thinner, so your bake time may be slightly longer.
Spices: If you don’t have individual spices on hand, you can replace the ginger, nutmeg, cloves, and pepper with 1 teaspoon pumpkin pie spice.
Still include the full 1 1/2 teaspoons of cinnamon for warmth and balance.
Pie Crust: Whether homemade or store-bought, always pre-bake the crust to avoid sogginess.
If using a graham cracker or cookie crust, pre-bake for 10 minutes. Pie weights aren’t necessary for cookie-based crusts, but they are essential for traditional pastry crusts to maintain shape
Pie Crust Leaves: Use any leftover dough to create decorative leaves.
Roll the dough to about 1/8-inch thickness on a floured surface.
Cut shapes using fall cookie cutters, then lightly brush with egg wash.
If you want added detail, score small leaf veins using a sharp knife.
Bake at 350°F (177°C) for about 10 minutes or until lightly golden.
Cool completely before decorating the pie.
Mini Pumpkin Pies: This recipe can easily be adapted into mini pies. Use small tart pans or a muffin tin lined with mini crusts. Because the crusts are smaller, you typically won’t need to blind bake them. Bake until the centers are just set. These make wonderful bite-sized treats for holiday gatherings.
Special Tools (affiliate links): Glass Mixing Bowls | Saucepan | Baking Sheet | Silicone Baking Mat or Parchment Paper | Rolling Pin | 9-inch Pie Dish | Pastry Brush | Pie Weights | Whisk | Pie Crust Shield | Cooling Rack | Fall Cookie Cutters.


")
+ COMMENTS
add a comment